When you write articles, reports or papers, you often spend more time searching than writing. The web pages you referenced are in your browser bookmarks, the back-and-forth with your editor (or your co-authors and advisor, for a paper) is in your email, the figures are inside a charting app, and the draft is in your text editor. Come back to a draft after a few days, and the first thing you do is gather everything up again.
Orviss is a notes app that keeps everything for a piece of work together in one folder, called a project. This article follows one piece from start to finish to show how writers can use Orviss.
Create one project per piece
In Orviss, work that has a goal and an end is handled as a project. A single article or paper is exactly that. Start by creating a project for each piece you write.
- Choose Projects in the tabs on the left
- Click + and enter a name for the project (for example, “Guest post: getting started with remote work”)
A project is an ordinary folder inside Projects in your Orviss folder. It comes with one note already in it: the Project Overview.
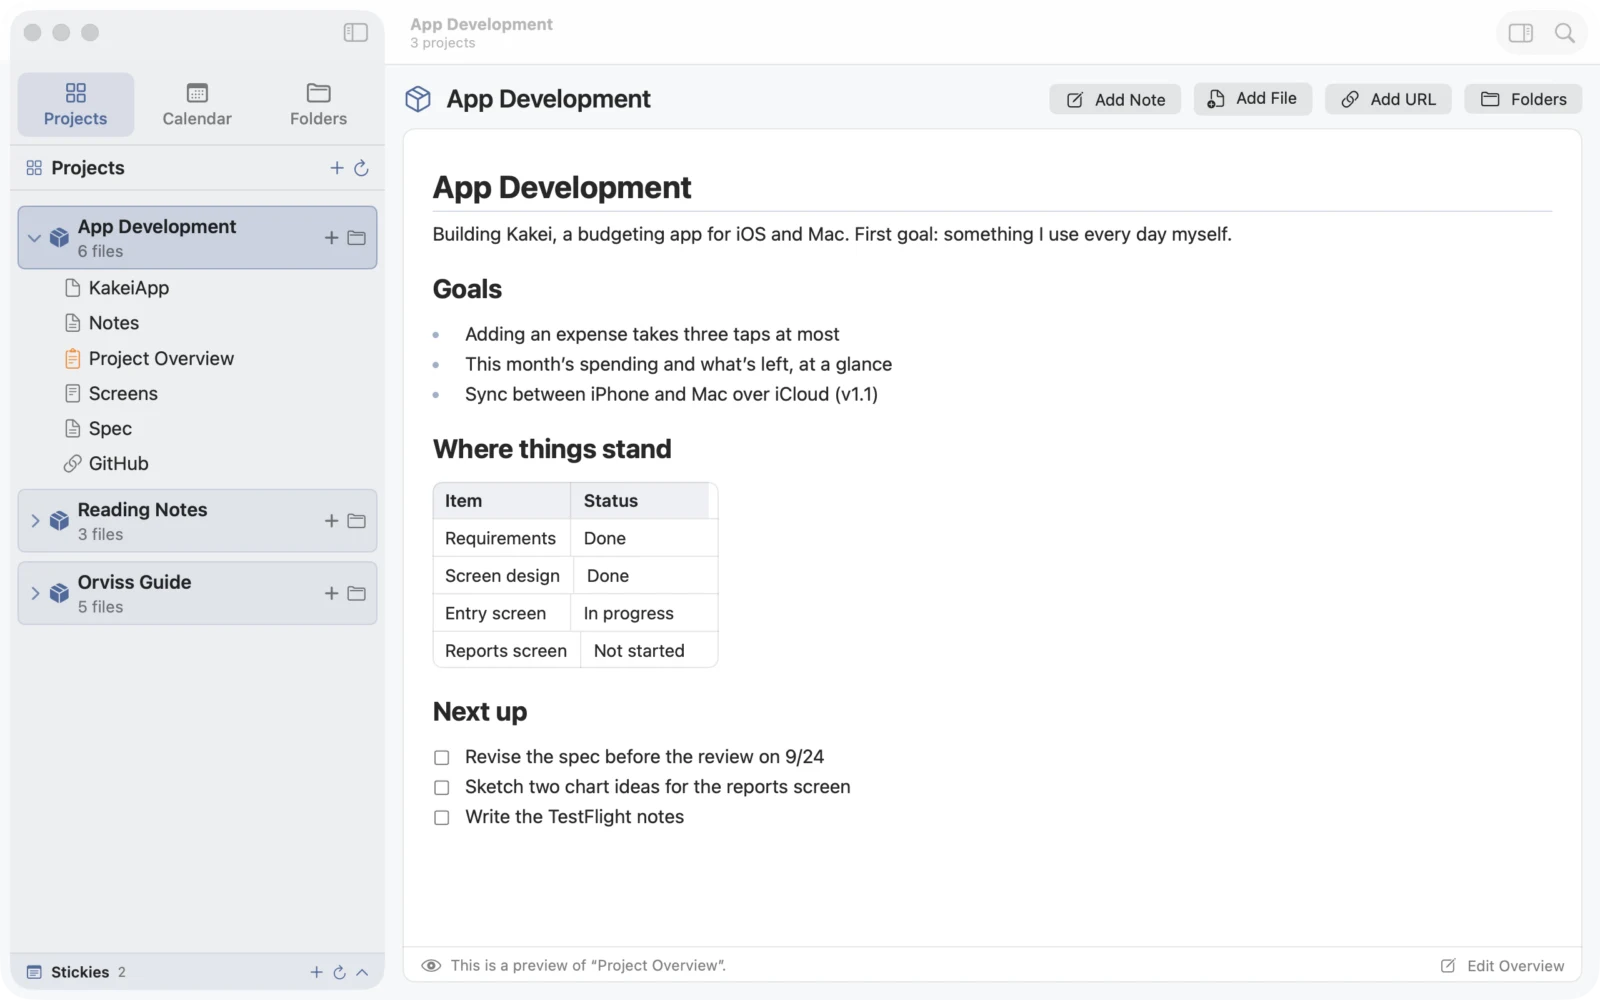
The Project Overview is a handy place to write down the “specs” for the piece:
- Where it will be published, and your editor’s name and contact details
- The deadline and word count
- Who the readers are, and what the piece needs to say
- A checklist of things to do (written like
- [ ] Check the figure 2 data with the editor)
Any unchecked checklist items in your notes are gathered automatically in Next Up on the right side of the window. When you come back to a draft after a while, you can see right away where to pick up.
The Project Overview template is a Markdown file too, so you can edit it. Make a writing template with fields for the publication, deadline and word count, and every new piece starts in the same format.
Collect your sources and emails with your editor
Everything you need for the piece goes into this project.
- Web pages: Drag a page from Safari onto the project, or copy the URL, select the project and press ⌘V (Ctrl+V on Windows). The page is saved as a note named “URL – page title.md”, and you can read it right inside Orviss
- Email: Drag a message from Mail onto the project, and it becomes a note with the sender, body and attachments. Keep the assignment, revision requests and proofreading back-and-forth right next to your draft (on Windows, drop the email’s .eml file instead)
- PDFs of papers, interview notes, photos and data tables: Just drop them in from the Finder. Even files Orviss can’t open can live in the project
- From other apps: Use the Share menu to save web pages, text and images
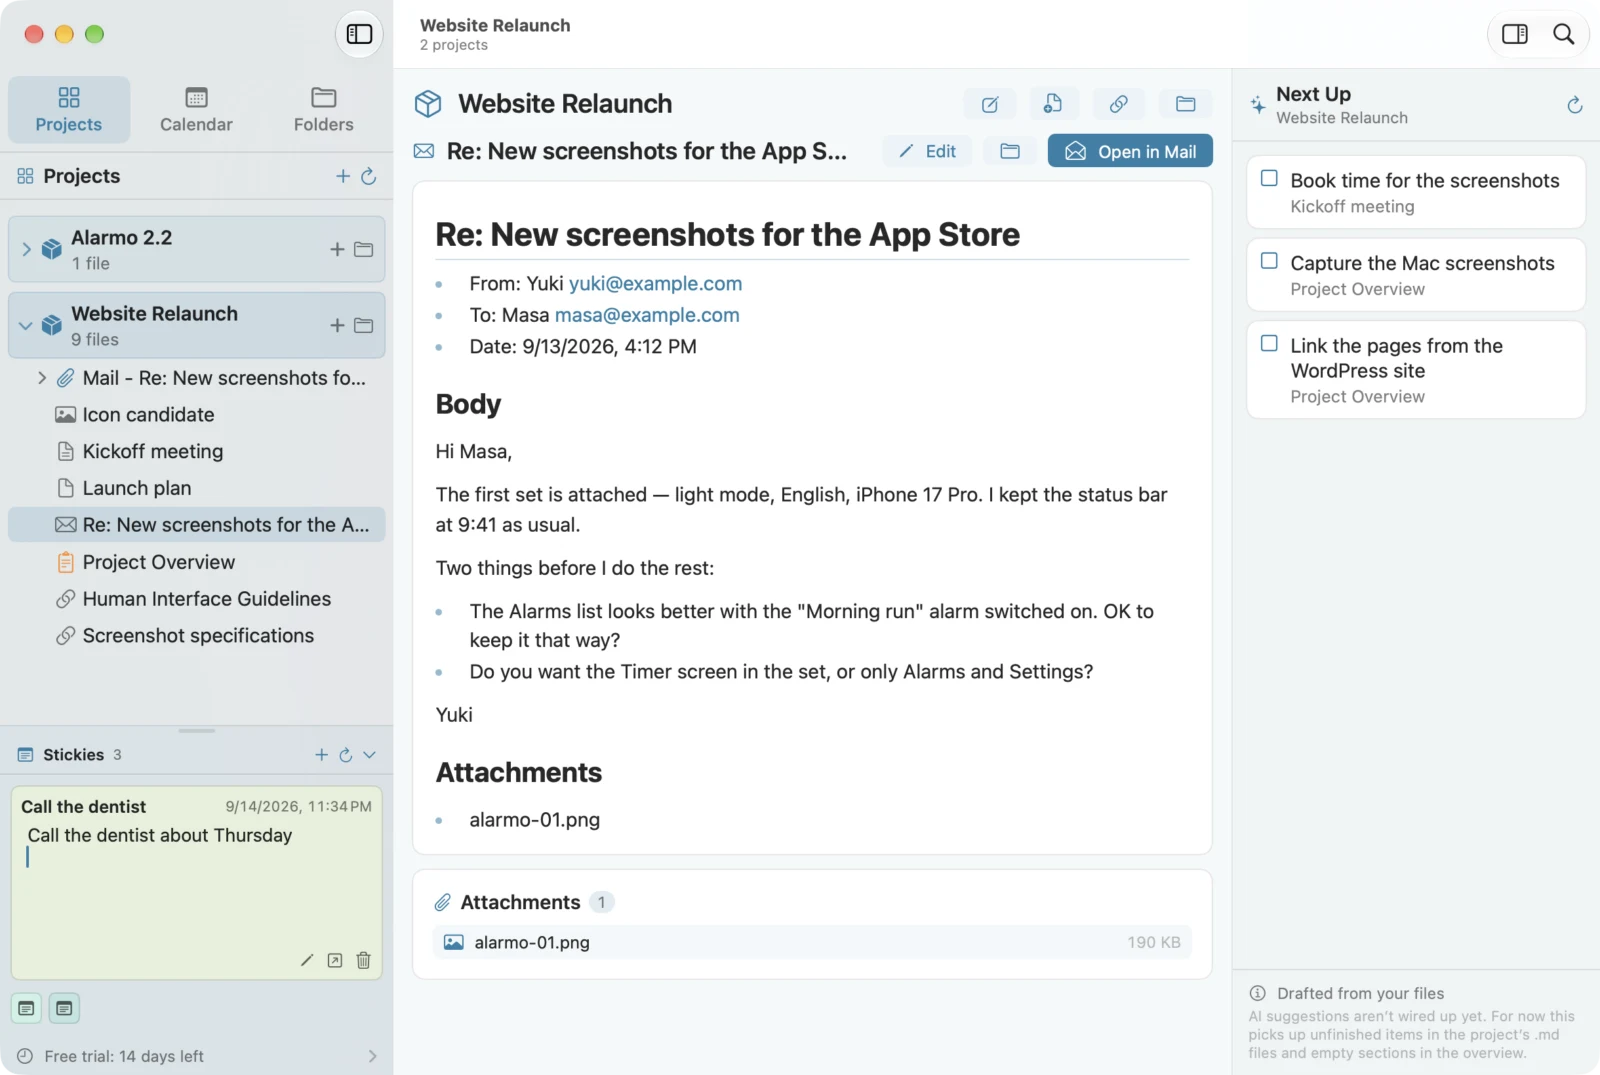
When you need to find where a number came from, or how many words your editor asked for, the only place you have to look is this project’s folder.
Start writing in Markdown
Once your material is in place, click Add Note to create a note for the draft and start writing. Every note in Orviss is a Markdown (.md) file.
Markdown is a way of writing headings, lists and other formatting with nothing but ordinary characters.
```markdown
# Article title

## Introduction

When you start working remotely, there are **three** things to decide first.

- How you’ll keep in touch
- How you’ll track your hours
- Where your files will live
```
A # at the start of a line makes a heading, text wrapped in ** becomes bold, and - starts a list item. You can also insert headings, lists, tables and images from the toolbar, so you don’t need to memorize the symbols.
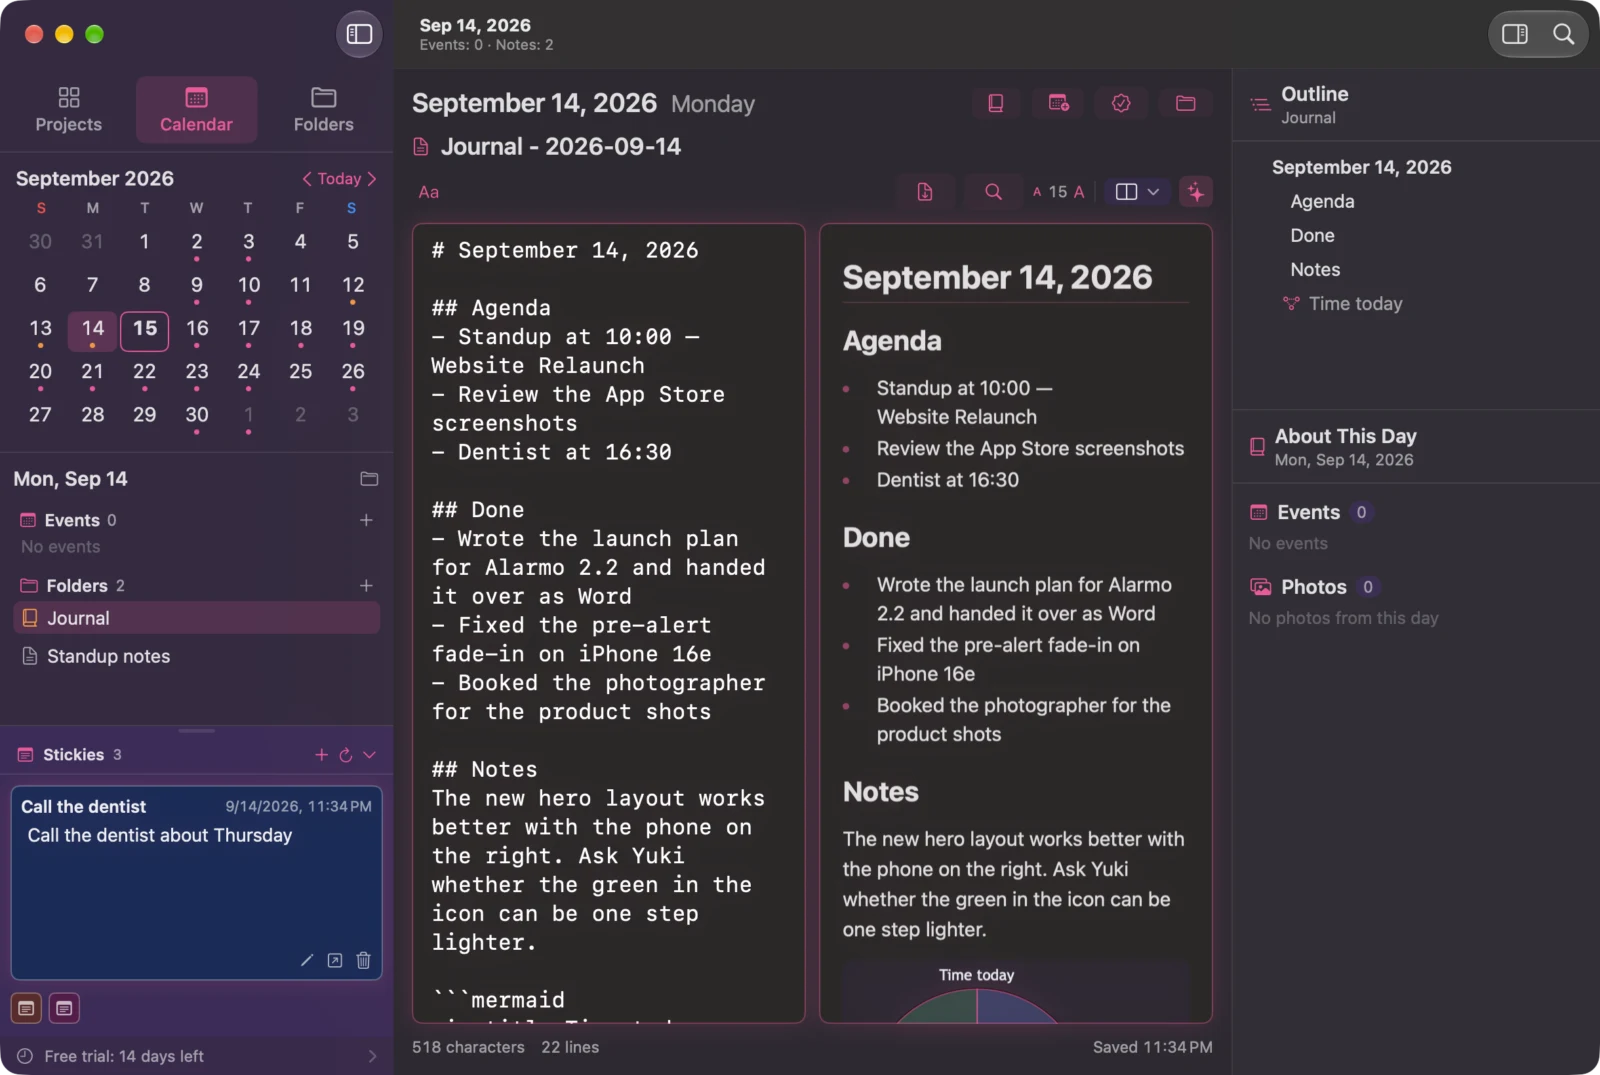
The editor can show your note in Live (formatting appears as you type), Split Side by Side or Split Top and Bottom (the source and the result together), or Preview (the result only).
For writers, Markdown has some real advantages:
- You can focus on the content: No fonts or margins to fiddle with, just the words and the structure
- It opens in any app: An .md file is just a text file. You can open it without Orviss, even 10 years from now
- Your headings become the skeleton of the draft: It suits a style where you lay out the headings first as an outline, then fill in the content
Draw diagrams right in your draft with Mermaid
Articles and papers are full of diagrams: the steps of a process, how something works, a breakdown of numbers. Usually you make them in a charting or drawing app, export them as images and paste them into your draft. If a single number changes, it’s back to that app to make the diagram again.
The Orviss editor supports Mermaid, a way of drawing diagrams with text. You write boxes and arrows inside a code block whose language is set to mermaid.
```mermaid
flowchart LR
    A[Research] --> B[Plan the outline]
    B --> C[Write]
    C --> D[Editor review]
    D -->|Changes needed| C
    D -->|OK| E[Submit]
```
That’s all it takes to get a diagram like this:

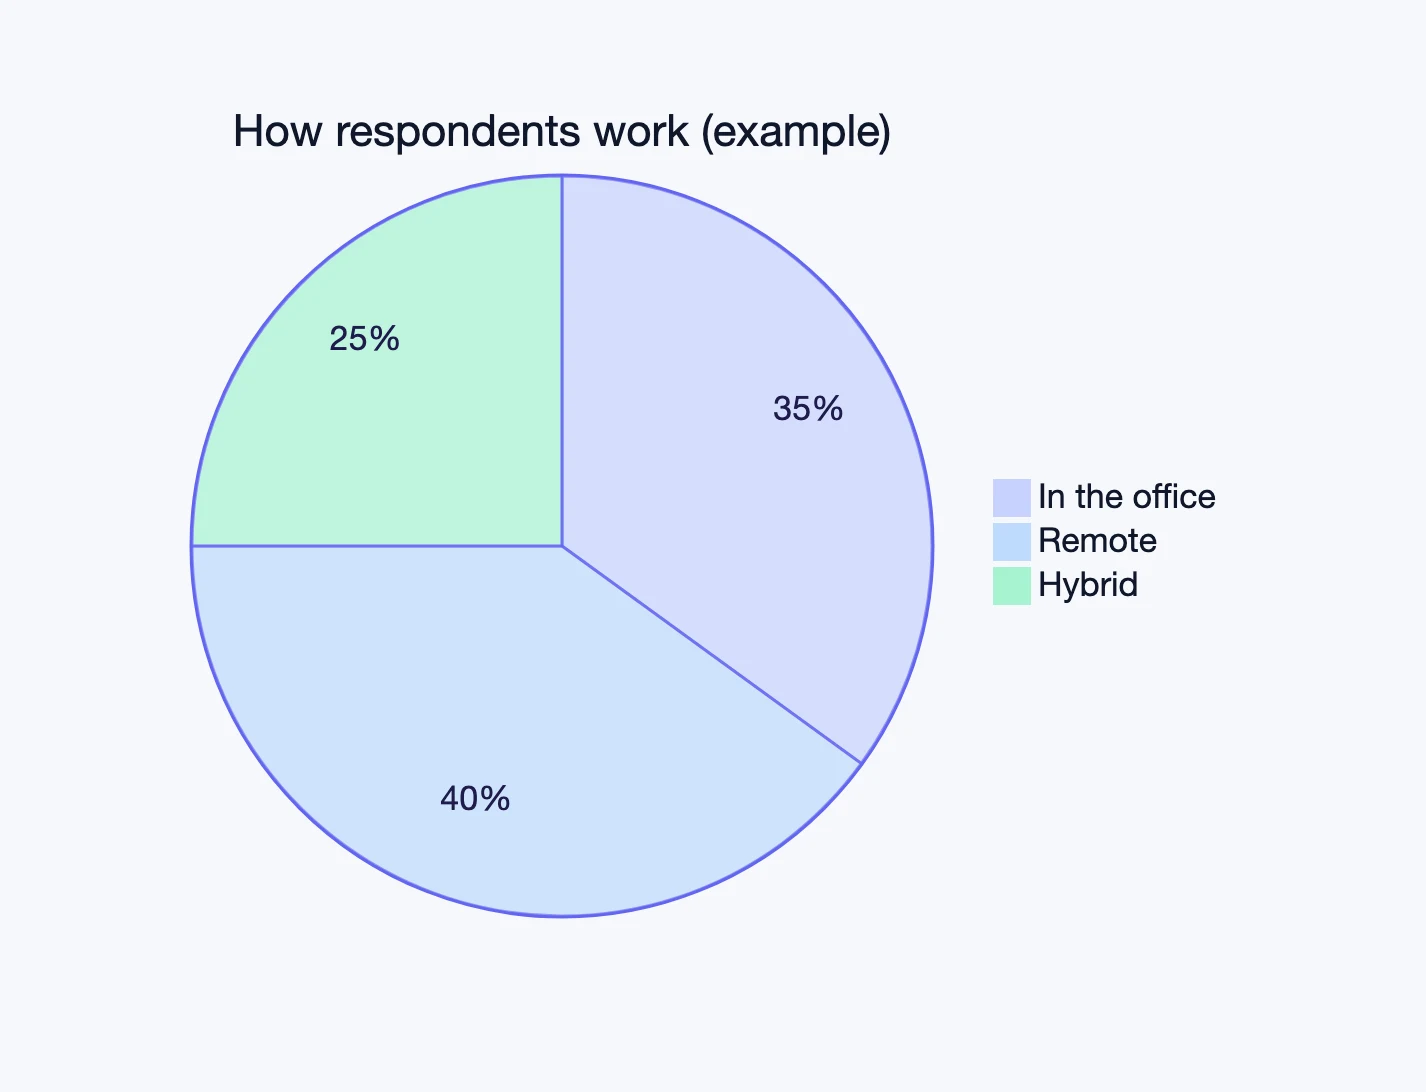
For a breakdown of numbers, you can write a pie chart, too.
```mermaid
pie title How respondents work (example)
    "In the office" : 35
    "Remote" : 40
    "Hybrid" : 25
```
Because the diagram is text inside your draft, you can fix it on the spot, while you write.
- To add a “Proofread” step between “Editor review” and “Submit,” just add one line
- If the survey numbers change, just edit the numbers in the pie chart
- If you mistype something, the line is pointed out below the editor
No more round trips of opening a charting app, fixing the chart, exporting it and pasting it back in. With the diagrams and the text in the same file, you’re also less likely to end up with updated text next to an outdated diagram.
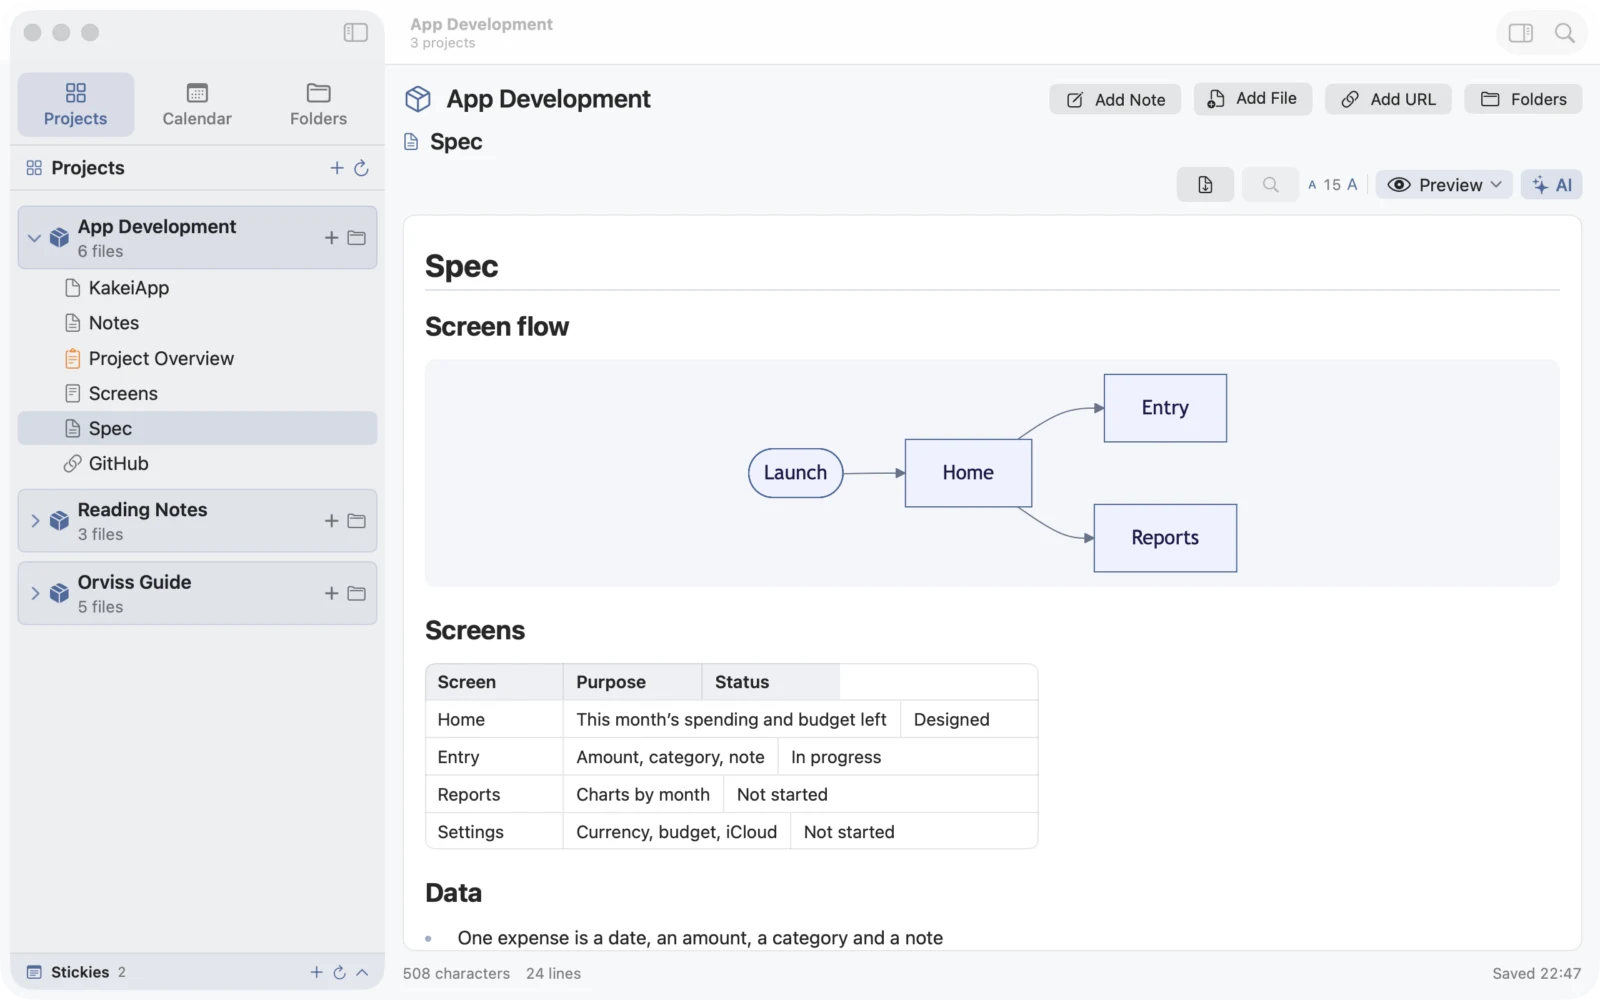
Insert Diagram on the toolbar adds a starting template for a flowchart, sequence diagram, Gantt chart, pie chart, mind map, timeline and more. Mermaid is built into Orviss, so you can draw diagrams offline. To learn how to write Gantt charts, see “How to manage projects with Markdown and Mermaid Gantt charts.”
Rearrange sections with drag and drop
As you write, you sometimes realize a section would read better earlier on. In a long draft, cutting a whole section and pasting it somewhere else takes more care than you’d expect.
In Orviss, when you open a note, the Outline appears on the right side of the window (you can see it on the right of the image in “Start writing in Markdown”). The Outline lists the headings, diagrams and images in the order they appear in your draft.
- Click a heading in the Outline to jump to that spot in the draft
- Drag a heading to another place, and the draft is rearranged, along with all the text under that heading
- Diagrams and images can be dragged the same way
There’s no repeated cutting and pasting, and no worrying about leaving part of a paragraph behind. In Live view, you can still Undo after rearranging.
Export a PDF when the draft is done
When the draft is ready, click Export as PDF on the editor’s toolbar. The PDF is A4 size and looks just like the preview, Mermaid diagrams included. Use it for your editor’s review or as the version you submit.
If your publication wants a Word (.docx) file, you can convert the same .md file with Markdocx, another of our apps (see “3 ways to convert Markdown to Word (.docx) on Mac” for details).
Archive the project when you’re finished
Once the piece is published, archive the project. Right-click the project and choose Archive, and it disappears from the project list, leaving only the pieces you’re still working on.
Archiving doesn’t delete anything. The project folder simply moves to Orviss Settings/Archives inside your Orviss folder. To bring it back to the list at any time, go to Archived Projects in Settings and choose Restore.
And those archived drafts become valuable examples when you write with AI, as the next section shows.
Write with AI, using your Orviss folder as an outboard brain
AI agents like Claude Code, Codex and Cursor can read and write the files in a folder you point them to (a workspace).
Setting it up is simple: just make your Orviss folder the AI agent’s workspace. Your Orviss data is nothing but ordinary folders and Markdown files on your computer, so there’s no special integration to set up.
Then just ask in plain language:
- “Write a draft from this project’s sources, in the style of the remote work article I wrote last year”
- “Read the emails from my editor and list the changes they asked for”
- “Check the numbers in my draft against the web pages I saved”
- “Redraw the pie chart in figure 2 with the new survey numbers”
The AI picks up your style and structure from past drafts (archived projects included), and the deadline, word count and key message from this project’s sources and emails. Saying “like that article I wrote” is enough, because everything you’ve written is in the same folder.
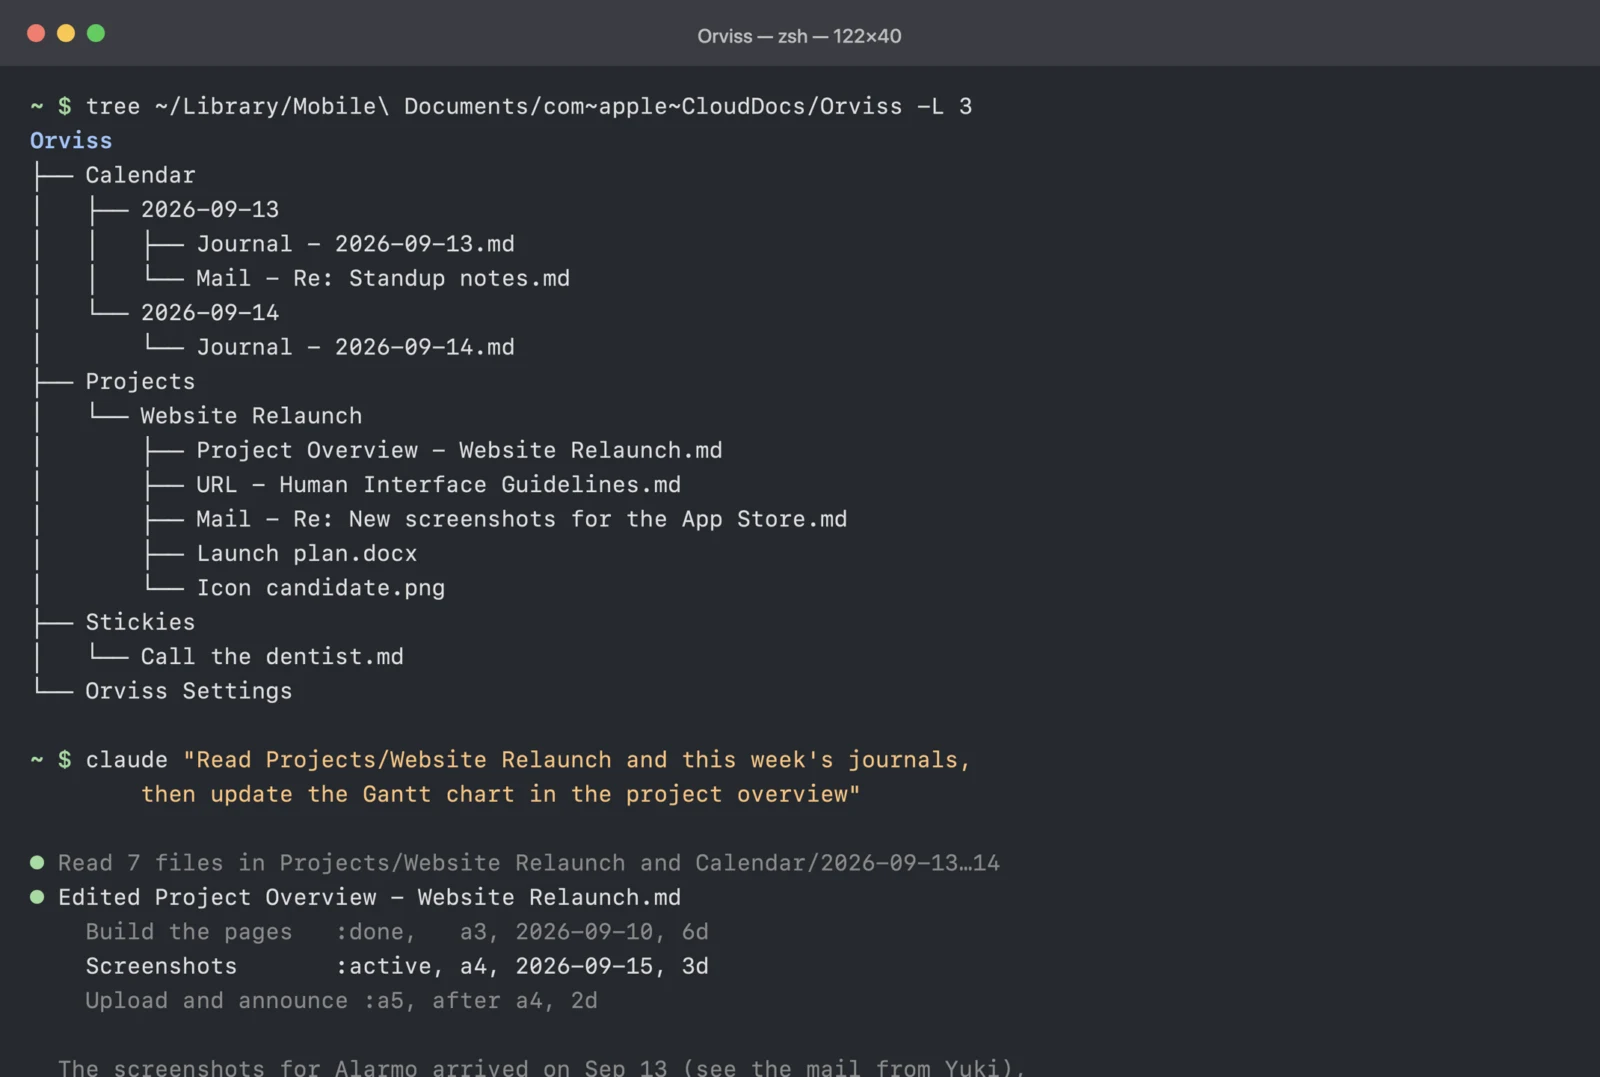
Mermaid diagrams are text too, so the AI can edit them directly. Notes the AI writes and diagrams it fixes show up in Orviss right away.
Orviss works as an outboard brain for AI. The more you write, the more material builds up in the folder, and the more you can ask the AI to do.
Note that when you use an online AI service, the contents of the files the AI reads are sent to that service. Take care with unpublished drafts and the personal information of the people you interview. If you’d rather keep everything on your device, use Write a draft with AI, the AI built into Orviss: on supported Macs (Apple Intelligence) and Copilot+ PCs, it creates drafts entirely on the device.
Summary
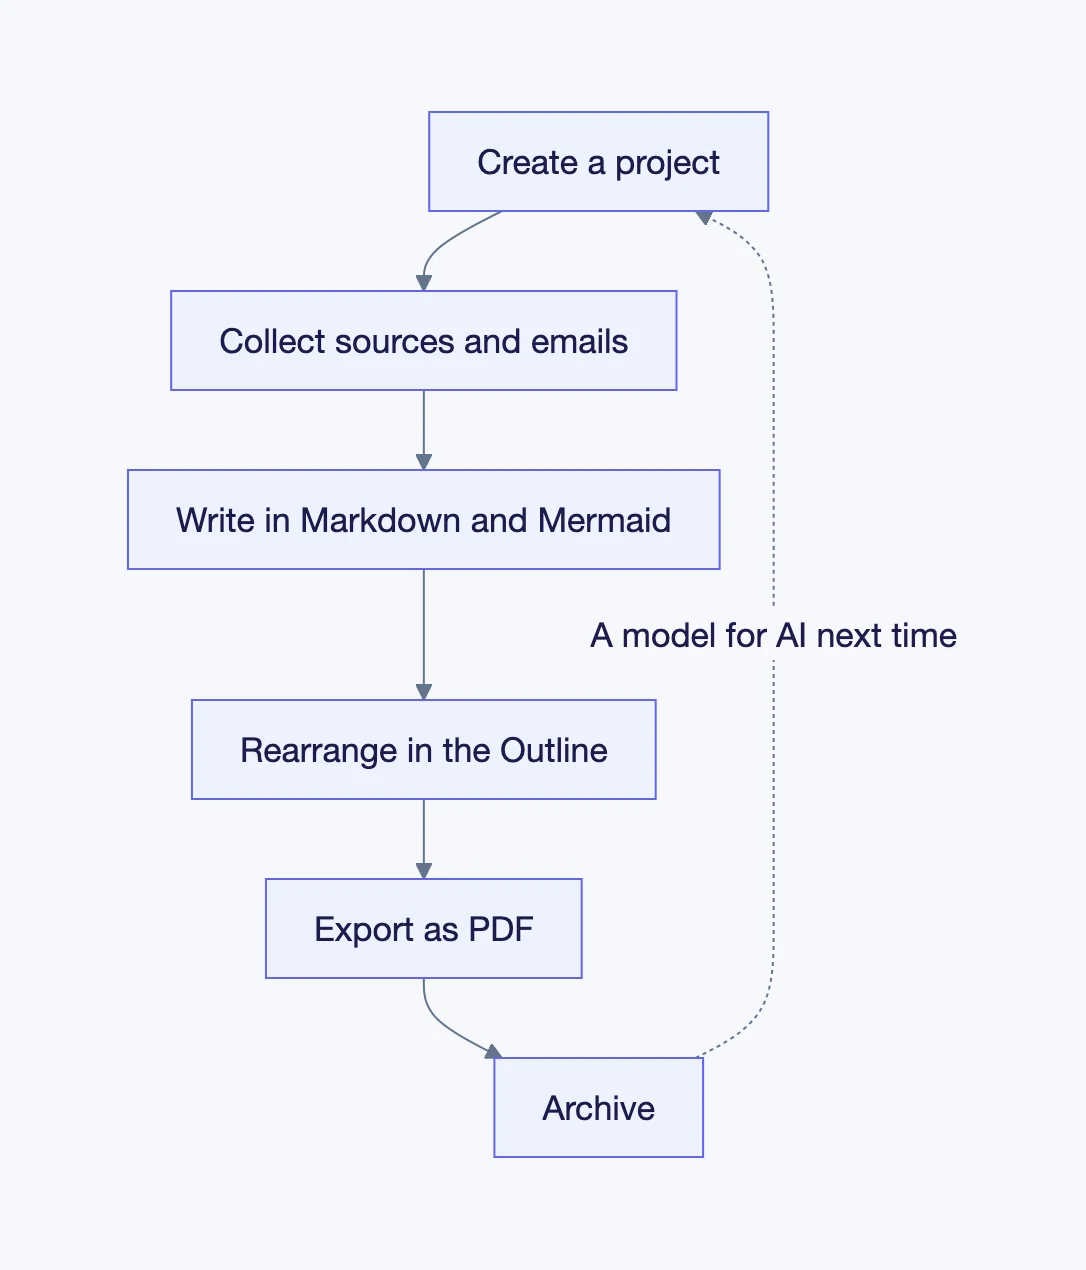
- Create a project for each piece, and gather sources, web pages and emails in one folder
- Write in Markdown and draw diagrams in your draft with Mermaid. No need to switch apps to fix a diagram
- Rearrange sections by dragging them in the Outline, and finish by exporting a PDF
- Archive the project when you’re finished. Your past drafts become examples for the AI when you write the next piece
Orviss is available for Mac and Windows. You can try every feature free for the first 14 days (15 days on Windows).